How to write a Stack in Rust
In this series I show the simplest way to build some data structures in Rust.
These implementations are not guaranteed to be the most performant. I only guarantee that they work as they are intended to work theoretically. If you are looking for the most performant solution consider using libraries (crates).
What is a stack?
We'll start with a very commonly used data structure called Stack. Even you if you have never heard about stacks, you probably are already indirectly familiar with them: arrays/vectors are a more powerful version of stacks. Basically, a stack is a collection of items to which you can add items and from which you can remove items, but only in a certain order: last in - first out (LIFO). If you get on a very crowded train, you will be the first who needs to get off so that other people can too.

Unlike in arrays, you cannot directly access any item in a stack. You can only peek at the last added one. To further the analogy, if you need to interact with a friend on the train above, you cannot do so until every person in front of your friend gets off first.
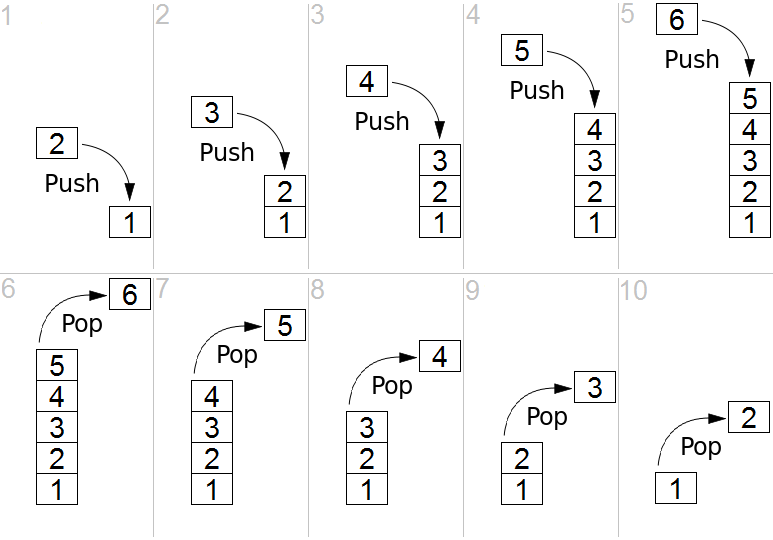
Here's the more schematic version of a stack:

Adding items is usually called push and removing items is usually called pop.
Since these methods are already available to us in Rust via the Vec (vector) data structure, let us build a stack on top of it.
Note that both Vecs and arrays have push and pop but we use Vecs because they do not have a fixed size.
Create
First, let's define a struct and call it Stack:
struct Stack<T> {
  stack: Vec<T>,
}
We want our stack to be able to store different kinds of types so we make it generic by using T instead of any specific type like i32.
Now, to create a new stack we can do this:
let s = Stack { stack: Vec::new() };
But the more idiomatic way would be to define a new method for our stack, just like the one you used to create a new Vec.
impl<T> Stack<T> {
  fn new() -> Self {
    Stack { stack: Vec::new() }
  }
}
If you are not familiar with the impl (method) syntax you can read more about it here.
Push and pop
Implementing push and pop methods is very easy: we can simply reuse the methods defined on Vec:
fn pop(&mut self) -> Option<T> {
  self.stack.pop()
}

fn push(&mut self, item: T) {
  self.stack.push(item)
}
One caveat here is the return type of pop: you do not get the actual item, but an Option, because the vector may be empty, in which case you get a None.
Utilities
One good method to have is is_empty which tells us whether our stack is empty. Luckily, Vecs already have this method, so we just reuse it.
fn is_empty(&self) -> bool {
  self.stack.is_empty()
}
We also need a length method which purpose is obvious:
fn length(&self) -> usize {
   self.stack.len()
}
Another method that is associated with a stack is peek. It allows us to see the last added item.
fn peek(&self) -> Option<&T> {
    self.stack.last()
}
This one is a little bit more complicated. The reason is that we cannot just return the item itself - that would be equal to removing it. Instead we only return a reference (&) to it. And the reference itself is wrapped in an Option because the stack may be empty (in which case you get a None).
Now we have a functioning a stack! Here's the full code:
struct Stack<T> {
  stack: Vec<T>,
}

impl<T> Stack<T> {
  fn new() -> Self {
    Stack { stack: Vec::new() }
  }

  fn length(&self) -> usize {
    self.stack.len()
  }

  fn pop(&mut self) -> Option<T> {
    self.stack.pop()
  }

  fn push(&mut self, item: T) {
    self.stack.push(item)
  }

  fn is_empty(&self) -> bool {
    self.stack.is_empty()
  }

  fn peek(&self) -> Option<&T> {
    self.stack.last()
  }
}
And this is how you would you use it in code:
let mut stack: Stack<isize> = Stack::new();
stack.push(1);
let item = stack.pop();
assert_eq!(item.unwrap(), 1);
You can also see the full code on my github.
Next time
In the next part of this series I will show how to build another common and useful structure - Queue. In the meantime, you can get the latest updates if you follow me on Twitter.